Thursday, 12 May 2016

Openstack Docker Integration with VDX

Openstack Kuryr (Docker) Integration with Brocade VDX (AMPP)

Openstack kuryr is integrated with neutron. Kuryr provides a remote driver as per the contatiner Networking Model. Kuryr driver translates the libnetwork callbacks to appropriate neutron calls.
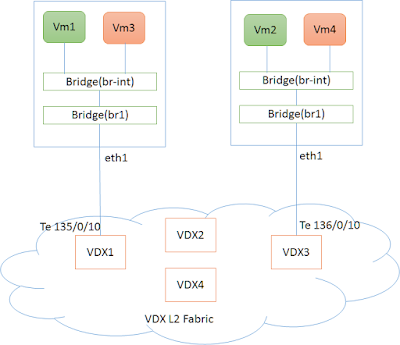
Here we are going to show case the integration of Kuryr with Brocade VDX Device

Setup of Openstack Plugin

Pre-requisites

Brocade Plugins require a specific version of ncclient (Net conf library). It can be obtained from the following github location.

git clone https://github.com/brocade/ncclient
cd ncclient
sudo python setup.py install

Install Brocade Plugin

git clone https://github.com/openstack/networking-brocade.git --branch=<stable/branch_name>
cd networking-brocade
sudo python setup.py install

Note: branch is an optional if the latest files(master branch) from the repository is required.

Upgrade the Database

Upgrade the database so that Brocade specific table entries are created in neutron database

 neutron-db-manage  --config-file /etc/neutron/neutron.conf  
  --config-file /etc/neutron/plugins/ml2/ml2_conf.ini upgrade head

Openstack Controller Configurations (L2 AMPP Setup)

Following configuration lines needs to be available in ‘/etc/neutron/plugins/ml2/ml2_conf.ini’ to start Brocade VDX Mechanism driver (brocade_vdx_vlan).

[ml2]
tenant_network_types = vlan
type_drivers = vlan
mechanism_drivers = openvswitch,brocade_vdx_ampp
[ml2_type_vlan]
network_vlan_ranges = physnet1:2:500
[ovs]
bridge_mappings = physnet1:br1

Here,

  • mechanism driver needs to be set to ‘brocade_vdx_ampp’ along with openvswitch.
  • ‘br1’ is the openvswith bridge.
  • ‘2:500’ is the vlan range used

Following configuration lines for the VDX Fabric needs to be added to either ‘/etc/neutron/plugins/ml2/ml2_conf_brocade.ini’ or ‘/etc/neutron/plugins/ml2/ml2_conf.ini’.

If added to ‘/etc/neutron/plugins/ml2/ml2_conf_brocade.ini’ then this file should be given as config parameter during neutron-server startup.

[ml2_brocade]
username = admin 
password = password 
address  = 10.37.18.139
ostype   = NOS 
physical_networks = physnet1 
osversion=5.0.0
initialize_vcs = True
nretries = 5
ndelay = 10
nbackoff = 2

Here,
[ml2_brocade] - entries

  • 10.37.18.139 is the VCS Virtual IP (IP for the L2 Fabric).
  • osversion - NOS version on the L2 Fabric.
  • nretries - number of netconf to the switch will be retried in case of failure
  • ndelay - time delay in seconds between successive netconf commands in case of failure

Openstack Compute Configurations (L2 AMPP Setup)

Following configuration lines needs to be available in one of the configuration files used by openvswitch agent.
e.g /etc/neutron/plugins/openvswitch/ovs_neutron_plugin.ini

[ovs]
bridge_mappings = physnet1:br1
network_vlan_ranges = 2:500
tenant_network_type = vlan

Here,

  • ‘br1’ is the openvswitch bridge.
  • ‘2:500’ is the vlan range used

VDX Configurations

Put all the interfaces connected to compute node in port-profile mode. This is a one-time configuration. (Te 135/0/10 and Te 136/0/10 in the topology above).

sw0(config)#  interface TenGigabitEthernet 135/0/10
sw0(conf-if-te-135/0/10)# port-profile-port
sw0(config)#  interface TenGigabitEthernet 136/0/10
sw0(conf-if-te-136/0/10)# port-profile-port

Setup of Kuryr

Install Kuryr project on both compute and controller (each of the the host nodes)

sudo pip install https://github.com/openstack/kuryr.git
sudo pip install -r requirements.txt
sudo ./scripts/run_kuryr.sh

Update the ‘"/etc/kuryr/kuryr.conf’ to contain the following lines, kuryr driver is run in the global scope and neutron_uri is provided of the neutron server.

[DEFAULT]
capability_scope = global

[neutron_client]
# Neutron URL for accessing the network service. (string value)
neutron_uri = http://10.37.18.158:9696

Restart both the remote driver(stop the one started earlier in the above step) and the docker service

sudo ./scripts/run_kuryr.sh
sudo service docker restart

Docker CLI command

Create Network

Create a Docker Network called “black_network” on the docker swarm having the subnet 92.16.1.0/24

root@controller:~# docker_swarm network create --driver kuryr --subnet=92.16.1.0/24 --gateway=92.16.1.1   black_network
2e36e5ac17f2d4a3534678e58bc4920dbcd8653919a83ad52cbaa62057297a84


This creates a neutron network with segmentation id (vlan) 43

root@controller:~# neutron net-show kuryr-net-2e36e5ac
+---------------------------+----------------------------------------------------+
| Field                     | Value                                              |
+---------------------------+----------------------------------------------------+
| admin_state_up            | True                                               |
| availability_zone_hints   |                                                    |
| availability_zones        | nova                                               |
| created_at                | 2016-05-12T11:16:55                                |
| description               |                                                    |
| id                        | 23beebb7-c4ec-41be-a12a-96f897b1dace               |
| ipv4_address_scope        |                                                    |
| ipv6_address_scope        |                                                    |
| mtu                       | 1500                                               |
| name                      | kuryr-net-2e36e5ac                                 |
| port_security_enabled     | True                                               |
| provider:network_type     | vlan                                               |
| provider:physical_network | physnet1                                           |
| provider:segmentation_id  | 43                                                 |
| router:external           | False                                              |
| shared                    | False                                              |
| status                    | ACTIVE                                             |
| subnets                   | 5072db88-54be-4be0-a39b-f52b60a674ef               |
| tags                      | kuryr.net.uuid.uh:bcd8653919a83ad52cbaa62057297a84 |
|                           | kuryr.net.uuid.lh:2e36e5ac17f2d4a3534678e58bc4920d |
| tenant_id                 | 1035ac77d5904b0184af843e58c37665                   |
| updated_at                | 2016-05-12T11:16:56                                |
+---------------------------+----------------------------------------------------+

This creates a port-profile on the switch with appropriate parameters.

sw0(config)# do show running-config port-profile openstack-profile-43
port-profile openstack-profile-43
 vlan-profile
  switchport
  switchport mode trunk
  switchport trunk allowed vlan add 43
 !
!
port-profile openstack-profile-43 activate

Create Docker Containers

Create a docker container on both the nodes in the docker_swarm

root@controller:~# docker_swarm run -itd --name=black_1 --env="constraint:node==compute" --net=black_network busybox
8079c6f22d8985307541d8fb75b1296708638a9150e0334f2155572dba582176
root@controller:~# docker_swarm run -itd --name=black_2 --env="constraint:node==controller" --net=black_network busybox
f8b4257abcf39f3e2d45886d61663027208b6596555afd56f3e4d8e45d641759

sw0(config)# do show port-profile status
Port-Profile           PPID        Activated        Associated MAC        Interface
UpgradedVlanProfile    1           No               None                  None
openstack-profile-43   2           Yes              fa16.3e2b.38b6        Te 135/0/10
                                                    fa16.3ebf.796c        Te 136/0/10
                                                    fa16.3ed6.7f0b        Te 135/0/10

Ping between Containers

root@controller:~# docker_swarm attach black_1
/ # ifconfig
eth0      Link encap:Ethernet  HWaddr FA:16:3E:BF:79:6C
          inet addr:92.16.1.2  Bcast:0.0.0.0  Mask:255.255.255.0
          inet6 addr: fe80::f816:3eff:febf:796c/64 Scope:Link
          UP BROADCAST RUNNING MULTICAST  MTU:1500  Metric:1
          RX packets:52 errors:0 dropped:14 overruns:0 frame:0
          TX packets:9 errors:0 dropped:0 overruns:0 carrier:0
          collisions:0 txqueuelen:1000
          RX bytes:5956 (5.8 KiB)  TX bytes:738 (738.0 B)

lo        Link encap:Local Loopback
          inet addr:127.0.0.1  Mask:255.0.0.0
          inet6 addr: ::1/128 Scope:Host
          UP LOOPBACK RUNNING  MTU:65536  Metric:1
          RX packets:0 errors:0 dropped:0 overruns:0 frame:0
          TX packets:0 errors:0 dropped:0 overruns:0 carrier:0
          collisions:0 txqueuelen:0
          RX bytes:0 (0.0 B)  TX bytes:0 (0.0 B)

/ # ping 92.16.1.3
PING 92.16.1.3 (92.16.1.3): 56 data bytes
64 bytes from 92.16.1.3: seq=0 ttl=64 time=1.825 ms
64 bytes from 92.16.1.3: seq=1 ttl=64 time=0.819 ms
64 bytes from 92.16.1.3: seq=2 ttl=64 time=0.492 ms
64 bytes from 92.16.1.3: seq=3 ttl=64 time=0.458 ms
64 bytes from 92.16.1.3: seq=4 ttl=64 time=0.489 ms
64 bytes from 92.16.1.3: seq=5 ttl=64 time=0.480 ms
64 bytes from 92.16.1.3: seq=6 ttl=64 time=0.438 ms
64 bytes from 92.16.1.3: seq=7 ttl=64 time=0.501 ms

Thursday, 5 May 2016

Brocade Docker Plugin

Brocade Docker Plugin

This describes the Brocade Docker Plugin which functions as remote libnetwork Driver.
It automates the provisioning of Brocade IP Fabric based on the life cycle of Docker Containers.

enter image description here

Fig 1. Docker Swarm nodes connected to Brocade IP Fabric.

Here, there are two hosts controller (10.37.18.158) and compute (10.37.18.157) which are part of the Docker swarm.
They are connected to Leaf switches ,10.37.18.135 and 10.37.18.136 respectively.

Key Aspects

Brocade Plugin functions as a global libnetwork remote driver within the Docker swarm.It is based on the new Container Network Model.

Docker networks are isolated using VLANs on the host-servers and the corresponding VLANs are provisioned on the Brocade IP Fabrics.

Brocade IP Fabric provisioning is automated and integrated with the lifecyle of containers. Tunnels between the leaf switches are only established when there are at-least two containers on different hosts on the same network. This is an important aspect as micro-services appear and disappear frequently in the container environment. Close integration of Brocade IP Fabrics with container life cycle helps in optimum usage of Network resources in such environments.

Brocade also provides container tracing functionality on its Brocade IP Fabric switches. Container tracing can be used to see the networking details like VLAN and interface details between the hosts in the Docker swarm and the leaf switches in the Brocade IP Fabric.

Brocade Plugin Operations

Initial Setup

Docker swarm(cluster of docker hosts) output displaying the two hosts in the swarm, controller(10.37.18.158) and compute (10.37.18.157)

root@controller:~# docker -H :4000 info
Nodes: 2
 compute: 10.37.18.157:2375
  └ Status: Healthy
  └ Containers: 2
  └ Reserved CPUs: 0 / 8
  └ Reserved Memory: 0 B / 12.31 GiB
 controller: 10.37.18.158:2375
  └ Status: Healthy
  └ Containers: 4
  └ Reserved CPUs: 0 / 8
  └ Reserved Memory: 0 B / 16.44 GiB

Container Tracer output as seen from one of the leaf switches in the Brocade IP Fabric. All fields are empty as there are no containers launched in the Docker swarm.

sw0:FID128:root> container_trace
+------+--------------+------+---------+----------+------------------+-----------------------+
----------------------+
| Name | Host Network | Vlan | Host IP | Host Nic | Switch Interface | Container IPv4Address |
 Container MacAddress |
+------+--------------+------+---------+----------+------------------+-----------------------+
----------------------+
+------+--------------+------+---------+----------+------------------+-----------------------+
----------------------+

No tunnel is established between leaf switches of Brocade IP Fabric as there are no containers launched in the docker swarm.

Welcome to the Brocade Network Operating System Software
admin connected from 172.22.10.83 using ssh on sw0
sw0# show tunnel brief
sw0#

Container Startup

Create a network named ‘red_network’ using the brocade libnetwork driver and create two busybox containers on each of the host servers using the newly created network.

root@controller:~# docker -H :4000 network create --driver brcd-global  --subnet=21.16.1.0/24
--gateway=21.16.1.1   red_network
4b722b1f90e64a986df8973aae6edf837193640161611805339676f1e6768f84

root@controller:~# docker -H :4000 run -itd --name=test1 --env="constraint:node==controller"
--net=red_network busybox
932a039045acc05e101d1196d9152e4391b0e62a9cf91c6b83b9fc9893738c6b

root@controller:~# docker -H :4000 run -itd --name=test2  --env="constraint:node==compute" 
--net=red_network busybox
1a32732651bf970ce60b027644c6ff48e8e3490d5b60644f75fb5785bfba6219

Brocade Plugin provisions VLAN on the host server and does the necessary configuration on the switch interfaces connected to the host server.

Container tracer on the Brocade switch displays the newly created containers with details like Network name (red_network), VLAN(2002), Host NIC and Switch Interface, Container IP and Mac Address.

sw0:FID128:root> container_trace
+-------+--------------+------+--------------+----------+------------------+-----------------------+
----------------------+
| Name  | Host Network | Vlan | Host IP      | Host Nic | Switch Interface | Container IPv4Address |
 Container MacAddress |
+-------+--------------+------+--------------+----------+------------------+-----------------------+
----------------------+
| test2 | red_network  | 2002 | 10.37.18.157 | eth2     | Te 136/0/10      | 21.16.1.3/24          |
 00:16:3e:04:95:e1    |
| test1 | red_network  | 2002 | 10.37.18.158 | eth4     | Te 135/0/10      | 21.16.1.2/24          |
 00:16:3e:4f:a4:49    |
+-------+--------------+------+--------------+----------+------------------+-----------------------+
----------------------+

Container tracer output would be useful for the network administrator for tracing the flow of traffic between containers as it transits through Brocade switches.

Tunnel gets established between the two leaf switches in the Brocade IP Fabric as two containers (test1 and test2) are launched on the two hosts in the docker swarm.

Tunnel output on the leaf switches of the Brocade IP Fabric indicates that tunnel has been established between the leaf switches connected to the two hosts in the docker swarm.

sw0# show tunnel brief
Tunnel 61441, mode VXLAN, rbridge-ids 135
Admin state up, Oper state up
Source IP 54.54.54.0, Vrf default-vrf
Destination IP 54.54.54.1

VLAN 2002 is received on Te 135/0/10 - interface connected to eth4 on host 10.37.18.158.
This VLAN is auto-mapped to VNI 2002 on the Brocade IP Fabric.

sw0# show vlan brief

VLAN   Name      State  Ports           Classification
(F)-FCoE                                                    (u)-Untagged
(R)-RSPAN                                                   (c)-Converged
(T)-TRANSPARENT                                             (t)-Tagged
===== ========= ====== =============== ====================
2002   VLAN2002  ACTIVE Te 135/0/10(t)
                        Tu 61441(t)     vni 2002

Ping between Containers

Container test1(21.16.1.2) on host (10.37.18.158) is able to communicate with Container test2 (21.16.1.3) on host (10.37.18.157).

root@controller:~# docker -H :4000 attach test1
/ # ping 21.16.1.3
PING 21.16.1.3 (21.16.1.3): 56 data bytes
64 bytes from 21.16.1.3: seq=0 ttl=64 time=0.656 ms
64 bytes from 21.16.1.3: seq=1 ttl=64 time=0.337 ms
64 bytes from 21.16.1.3: seq=2 ttl=64 time=0.358 ms
64 bytes from 21.16.1.3: seq=3 ttl=64 time=0.313 ms
64 bytes from 21.16.1.3: seq=4 ttl=64 time=0.324 ms
^C
--- 21.16.1.3 ping statistics ---
5 packets transmitted, 5 packets received, 0% packet loss
round-trip min/avg/max = 0.313/0.397/0.656 ms

Tunnel statistics showing the increasing trend of packets which indicates that the container traffic is transiting through Brocade IP Fabrics.

sw0# show tunnel statistics
Tnl ID   RX packets      TX packets      RX bytes        TX bytes
======== =============== =============== =============== ================
61441    3               3               (NA)            414
sw0# show tunnel statistics
Tnl ID   RX packets      TX packets      RX bytes        TX bytes
======== =============== =============== =============== ================
61441    7               7               (NA)            1022

Container Shutdown

Exit from Container 'test1 and explicit shutdown of the the other container test2

132 packets transmitted, 132 packets received, 0% packet loss
round-trip min/avg/max = 0.222/0.286/0.350 ms
/ # exit

root@controller:~# docker -H :4000 stop test2

Container shutdown results in the tear-down of tunnels between the leaf switches in the Brocade IP Fabric and the same is reflected by an empty output in the container trace output.

sw0# show tunnel brief

sw0:FID128:root> container_trace
+------+--------------+------+---------+----------+------------------+-----------------------+----------------------+
| Name | Host Network | Vlan | Host IP | Host Nic | Switch Interface | Container IPv4Address | Container MacAddress |
+------+--------------+------+---------+----------+------------------+-----------------------+----------------------+
+------+--------------+------+---------+----------+------------------+-----------------------+----------------------+

Brocade remote libnetwork driver can also works with Brocade VDX(Ethernet)Fabric in addition to automation Brocade IP Fabric.

Thursday, 14 April 2016

L2 MTU and Native VLAN on Brocade

Brocade Openstack VDX Plugin (Non AMPP)

This describes the provisioning of MTU and Native VLANS on L2 interfaces using Brocade (Non
https://github.com/openstack/networking-brocade/tree/master/networking_brocade/vdx
Setup of Openstack Plugin


Fig 1. Setup of VDX Fabric with Compute Nodes

The figure(fig 1) shows a typical Physical deployment of Servers(Compute Nodes) connected to VDX L2 Fabric.

  • eth1 on the controller Node is connected to VDX interface (e.g Te 135/0/10)
  • eth1 on the compute Node is connected to VDX interface (e.g Te 136/0/10)
  • NIC (eth1) on the servers (controller,compute ) are part of OVS bridge br1.

Note: To create bridge br1 on compute Nodes and add port eth1 to it.

sudo ovs-vsctl add-br br1
sudo ovs-vsctl add-port br1 eth1

In this setup, Virtual Machines would be created on each of the host servers(controller,compute) on a network by the name Green (10.0.0.0/24)

Setup of Openstack Plugin

Look at the setup of Openstack Plugin for L2 Non AMPP

http://rmadapur.blogspot.in/2016/04/l2-non-ampp-brocade-vdx-plugin.html

Openstack Controller Configurations (L2 Non AMPP Setup)

Refer to Configuration setup for [ml2] described in L2 Non AMPP

http://rmadapur.blogspot.in/2016/04/l2-non-ampp-brocade-vdx-plugin.html

Additional configurations that needs to be done to setup mtu and native vlans.

Following additional configuration lines for the VDX Fabric needs to be added to either ‘/etc/neutron/plugins/ml2/ml2_conf_brocade.ini’ or ‘/etc/neutron/plugins/ml2/ml2_conf.ini’.

If added to ‘/etc/neutron/plugins/ml2/ml2_conf_brocade.ini’ then this file should be given as config parameter during neutron-server startup.

[ml2]
segment_mtu = 2000
physical_network_mtus = physnet1:2000

[topology]
#connections=<host-name> : <physical network name>: <PORT-SPEED> <NOS PORT>
connections = controller:physnet1:Te:135/0/10, compute:physnet1:Te:136/0/10
mtu = Te:135/0/10:2000,Te:136/0/10:2000
native_vlans = Te:135/0/10:20,Te:136/0/10:20

[topology] - entries

  • Here mtu is set 2000 for both interfaces connected to the servers
  • native_vlan on the interface is set to 20

Openstack CLI Comands

Create Networks

Create a GREEN Network (10.0.0.0/24) using neutron CLI’s. Note down the id of the network created which will be used during subsequent nova boot commands.

user@controller:~$ neutron net-create GREEN_NETWORK
user@controller:~$ neutron subnet-create GREEN_NETWORK 10.0.0.0/24 --name GREEN_SUBNET --gateway=10.0.0.1
user@controller:~/devstack$ neutron net-show GREEN_NETWORK
+---------------------------+--------------------------------------+
| Field                     | Value                                |
+---------------------------+--------------------------------------+
| admin_state_up            | True                                 |
| availability_zone_hints   |                                      |
| availability_zones        | nova                                 |
| created_at                | 2016-04-15T05:41:13                  |
| description               |                                      |
| id                        | 21307c5c-b7e9-4bdc-a59c-1527e02080ff |
| ipv4_address_scope        |                                      |
| ipv6_address_scope        |                                      |
| mtu                       | 2000                                 |
| name                      | GREEN_NETWORK                        |
| port_security_enabled     | True                                 |
| provider:network_type     | vlan                                 |
| provider:physical_network | physnet1                             |
| provider:segmentation_id  | 50                                    |
| router:external           | False                                |
| shared                    | False                                |
| status                    | ACTIVE                               |
| subnets                   | d310745c-2726-4b79-adac-39e76e8d9b29 |
| tags                      |                                      |
| tenant_id                 | 23b20c38f7f14c2a8be5073c198c5178     |
| updated_at                | 2016-04-15T05:41:13                  |
+---------------------------+--------------------------------------+

Check the availability Zones, We will launch one VM each on one of the servers.

user@controller:~$ nova availability-zone-list
+-----------------------+----------------------------------------+
| Name                  | Status                                 |
+-----------------------+----------------------------------------+
| internal              | available                              |
| |- controller         |                                        |
| | |- nova-conductor   | enabled :-) 2016-04-11T05:10:06.000000 |
| | |- nova-scheduler   | enabled :-) 2016-04-11T05:10:07.000000 |
| | |- nova-consoleauth | enabled :-) 2016-04-11T05:10:07.000000 |
| nova                  | available                              |
| |- compute            |                                        |
| | |- nova-compute     | enabled :-) 2016-04-11T05:10:10.000000 |
| |- controller         |                                        |
| | |- nova-compute     | enabled :-) 2016-04-11T05:10:05.000000 |
+-----------------------+----------------------------------------+

Launching Virtual Machines

Boot VM1 on Server by the name “controller”

user@controller:~$nova boot --nic net-id=$(neutron net-list | awk '/GREEN_NETWORK/ {print $2}') 
 --image cirros-0.3.4-x86_64-uec --flavor m1.tiny --availability-zone nova:controller VM1

Boot VM2 on Server by the name “compute”

user@controller:~$nova boot --nic net-id=$(neutron net-list | awk '/GREEN_NETWORK/ {print $2}')
 --image cirros-0.3.4-x86_64-uec --flavor m1.tiny --availability-zone nova:compute VM2

VDX

Following L2 Networking entries would be created on VDX Switches.

sw0# show running-config interface TenGigabitEthernet 135/0/10
interface TenGigabitEthernet 135/0/10
 mtu 2000
 switchport
 switchport mode trunk
 switchport trunk allowed vlan add 50
 no switchport trunk tag native-vlan
 switchport trunk native-vlan 20
 spanning-tree shutdown
 fabric isl enable
 fabric trunk enable
 no shutdown
!
sw0# show running-config interface TenGigabitEthernet 136/0/10
interface TenGigabitEthernet 136/0/10
 mtu 2000
 switchport
 switchport mode trunk
 switchport trunk allowed vlan add 50
 no switchport trunk tag native-vlan
 switchport trunk native-vlan 20
 spanning-tree shutdown
 fabric isl enable
 fabric trunk enable
 no shutdown
!
sw0#

Ping between Virtual Machines across Hosts

We should now be able to ping between Virtual Machines on the two host servers.

Wednesday, 13 April 2016

L2 AMPP Brocade VDX Plugin

Brocade Openstack VDX Plugin (AMPP)

This describes the setup of Openstack Plugins for Brocade VDX devices for L2 Networking with AMPP
https://github.com/openstack/networking-brocade/tree/master/networking_brocade/vdx
Setup of Openstack Plugin


Fig 1. Setup of VDX Fabric with Compute Nodes

The figure(fig 1) shows a typical Physical deployment of Servers(Compute Nodes) connected to VDX L2 Fabric.

  • eth1 on the controller Node is connected to VDX interface (e.g Te 135/0/10)
  • eth1 on the compute Node is connected to VDX interface (e.g Te 136/0/10)
  • NIC (eth1) on the servers (controller,compute ) are part of OVS bridge br1.

Note: To create bridge br1 on compute Nodes and add port eth1 to it.

sudo ovs-vsctl add-br br1
sudo ovs-vsctl add-port br1 eth1

In this setup, Virtual Machines would be created on each of the host servers(controller,compute) on a network by the name Green (10.0.0.0/24)

Setup of Openstack Plugin

Pre-requisites

Brocade Plugins require a specific version of ncclient (Net conf library). It can be obtained from the following github location.

git clone https://github.com/brocade/ncclient
cd ncclient
sudo python setup.py install

Install Plugin

git clone https://github.com/openstack/networking-brocade.git --branch=<stable/branch_name>
cd networking-brocade
sudo python setup.py install

Note: branch is an optional if the latest files(master branch) from the repository is required.

Upgrade the Database

Upgrade the database so that Brocade specific table entries are created in neutron database

 neutron-db-manage  --config-file /etc/neutron/neutron.conf  
  --config-file /etc/neutron/plugins/ml2/ml2_conf.ini upgrade head

Openstack Controller Configurations (L2 Non AMPP Setup)

Following configuration lines needs to be available in ‘/etc/neutron/plugins/ml2/ml2_conf.ini’ to start Brocade VDX Mechanism driver (brocade_vdx_vlan).

[ml2]
tenant_network_types = vlan
type_drivers = vlan
mechanism_drivers = openvswitch,brocade_vdx_ampp
[ml2_type_vlan]
network_vlan_ranges = physnet1:2:500
[ovs]
bridge_mappings = physnet1:br1

Here,

  • mechanism driver needs to be set to ‘brocade_vdx_ampp’ along with openvswitch.
  • ‘br1’ is the openvswith bridge.
  • ‘2:500’ is the vlan range used

Following configuration lines for the VDX Fabric needs to be added to either ‘/etc/neutron/plugins/ml2/ml2_conf_brocade.ini’ or ‘/etc/neutron/plugins/ml2/ml2_conf.ini’.

If added to ‘/etc/neutron/plugins/ml2/ml2_conf_brocade.ini’ then this file should be given as config parameter during neutron-server startup.

[ml2_brocade]
username = admin 
password = password 
address  = 10.37.18.139
ostype   = NOS 
physical_networks = physnet1 
osversion=5.0.0
initialize_vcs = True
nretries = 5
ndelay = 10
nbackoff = 2

Here,
[ml2_brocade] - entries

  • 10.37.18.139 is the VCS Virtual IP (IP for the L2 Fabric).
  • osversion - NOS version on the L2 Fabric.
  • nretries - number of netconf to the switch will be retried in case of failure
  • ndelay - time delay in seconds between successive netconf commands in case of failure

Openstack Compute Configurations (L2 AMPP Setup)

Following configuration lines needs to be available in one of the configuration files used by openvswitch agent.
e.g /etc/neutron/plugins/openvswitch/ovs_neutron_plugin.ini

[ovs]
bridge_mappings = physnet1:br1
network_vlan_ranges = 2:500
tenant_network_type = vlan

Here,
- ‘br1’ is the openvswitch bridge.
- ‘2:500’ is the vlan range used

VDX Configurations

Put all the interfaces connected to compute node in port-profile mode. This is a one-time configuration. (Te 135/0/10 and Te 136/0/10 in the topology above).

sw0(config)#  interface TenGigabitEthernet 135/0/10
sw0(conf-if-te-135/0/10)# port-profile-port
sw0(config)#  interface TenGigabitEthernet 136/0/10
sw0(conf-if-te-136/0/10)# port-profile-port

Openstack CLI Comands

Create Networks

Create a GREEN Network (10.0.0.0/24) using neutron CLI’s. Note down the id of the network created which will be used during subsequent nova boot commands.

user@controller:~$ neutron net-create GREEN_NETWORK
user@controller:~$ neutron subnet-create GREEN_NETWORK 10.0.0.0/24 --name GREEN_SUBNET --gateway=10.0.0.1
user@controller:~$ neutron net-show GREEN_NETWORK
+---------------------------+--------------------------------------+
| admin_state_up            | True                                 |
| availability_zone_hints   |                                      |
| availability_zones        | nova                                 |
| created_at                | 2016-04-12T09:38:45                  |
| description               |                                      |
| id                        | d5c94db7-9040-481c-b33c-252618fb71f8 |
| ipv4_address_scope        |                                      |
| ipv6_address_scope        |                                      |
| mtu                       | 1500                                 |
| name                      | GREEN_NETWORK                        |
| port_security_enabled     | True                                 |
| provider:network_type     | vlan                                 |
| provider:physical_network | physnet1                             |
| provider:segmentation_id  | 12                                   |
| router:external           | False                                |
| shared                    | False                                |
| status                    | ACTIVE                               |
| subnets                   | 1217d77d-2638-4c5c-9777-f5cd4f4e5045 |
| tags                      |                                      |
| tenant_id                 | ed2196b380214e6ebcecc7d70e01eba4     |
| updated_at                | 2016-04-12T09:38:45                  |
+---------------------------+--------------------------------------+

Check the availability Zones, We will launch one VM each on one of the servers.

user@controller:~$ nova availability-zone-list
+-----------------------+----------------------------------------+
| Name                  | Status                                 |
+-----------------------+----------------------------------------+
| internal              | available                              |
| |- controller         |                                        |
| | |- nova-conductor   | enabled :-) 2016-04-11T05:10:06.000000 |
| | |- nova-scheduler   | enabled :-) 2016-04-11T05:10:07.000000 |
| | |- nova-consoleauth | enabled :-) 2016-04-11T05:10:07.000000 |
| nova                  | available                              |
| |- compute            |                                        |
| | |- nova-compute     | enabled :-) 2016-04-11T05:10:10.000000 |
| |- controller         |                                        |
| | |- nova-compute     | enabled :-) 2016-04-11T05:10:05.000000 |
+-----------------------+----------------------------------------+

Launching Virtual Machines

Boot VM1 on Server by the name “controller”

user@controller:~$nova boot --nic net-id=$(neutron net-list | awk '/GREEN_NETWORK/ {print $2}') 
 --image cirros-0.3.4-x86_64-uec --flavor m1.tiny --availability-zone nova:controller VM1

Boot VM2 on Server by the name “compute”

user@controller:~$nova boot --nic net-id=$(neutron net-list | awk '/GREEN_NETWORK/ {print $2}')
 --image cirros-0.3.4-x86_64-uec --flavor m1.tiny --availability-zone nova:compute VM2

VDX

Following L2 Networking entries would be created on VDX Switches.


sw0(conf-if-te-136/0/10)# do show port-profile status
Port-Profile              PPID   Activated        Associated MAC  Interface
UpgradedVlanProfile       1      No               None            None                                                                                                
openstack-profile-12      2      Yes              fa16.3ecb.2fab   Te 135/0/10
                                                  fa16.3ee4.b736   Te 136/0/10                                                               

Ping between Virtual Machines across Hosts

We should now be able to ping between Virtual Machines on the two host servers.

Tuesday, 12 April 2016

L2-NON AMPP Brocade VDX Plugin

Brocade Openstack VDX Plugin (Non AMPP)

This describes the setup of Openstack Plugins for Brocade VDX devices for L2 Networking (Non AMPP)
https://github.com/openstack/networking-brocade/tree/master/networking_brocade/vdx
Setup of Openstack Plugin


Fig 1. Setup of VDX Fabric with Compute Nodes

The figure(fig 1) shows a typical Physical deployment of Servers(Compute Nodes) connected to VDX L2 Fabric. -

  • eth1 on the controller Node is connected to VDX interface (e.g Te 135/0/10)
  • eth1 on the compute Node is connected to VDX interface (e.g Te 136/0/10)
  • NIC (eth1) on the servers (controller,compute ) are part of OVS bridge br1.

Note: To create bridge br1 on compute Nodes and add port eth1 to it.
sudo ovs-vsctl add-br br1
sudo ovs-vsctl add-port br1 eth1

In this setup, Virtual Machines would be created on each of the host servers(controller,compute) on a network by the name Green (10.0.0.0/24)

Setup of Openstack Plugin

Pre-requisites

Brocade Plugins require a specific version of ncclient (Net conf library). It can be obtained from the following github location.

git clone https://github.com/brocade/ncclient
cd ncclient
sudo python setup.py install

Install Plugin

git clone https://github.com/openstack/networking-brocade.git --branch=<stable/branch_name>
cd networking-brocade
sudo python setup.py install

Note: branch is an optional if the latest files(master branch) from the repository is required.

Upgrade the Database

Upgrade the database so that Brocade specific table entries are created in neutron database

 neutron-db-manage  --config-file /etc/neutron/neutron.conf  
  --config-file /etc/neutron/plugins/ml2/ml2_conf.ini upgrade head

Openstack Controller Configurations (L2 Non AMPP Setup)

Following configuration lines needs to be available in ‘/etc/neutron/plugins/ml2/ml2_conf.ini’ to start Brocade VDX Mechanism driver (brocade_vdx_vlan).

[ml2]
tenant_network_types = vlan
type_drivers = vlan
mechanism_drivers = openvswitch,brocade_vdx_vlan
[ml2_type_vlan]
network_vlan_ranges = physnet1:2:500
[ovs]
bridge_mappings = physnet1:br1

Here,

  • mechanism driver needs to be set to ‘brocade_vdx_vlan’ along with openvswitch.
  • ‘br1’ is the openvswitch bridge.
  • ‘2:500’ is the vlan range used

Following configuration lines for the VDX Fabric needs to be added to either ‘/etc/neutron/plugins/ml2/ml2_conf_brocade.ini’ or ‘/etc/neutron/plugins/ml2/ml2_conf.ini’.
If added to ‘/etc/neutron/plugins/ml2/ml2_conf_brocade.ini’ then this file should be given as config parameter during neutron-server startup.

[ml2_brocade]
username = admin 
password = password 
address  = 10.37.18.139
ostype   = NOS 
physical_networks = physnet1 
osversion=5.0.0
initialize_vcs = True
nretries = 5
ndelay = 10
nbackoff = 2

[topology]
#connections=<host-name> : <physical network name>: <PORT-SPEED> <NOS PORT>
connections = controller:physnet1:Te:135/0/10, compute:physnet1:Te:136/0/10

Here,
[ml2_brocade] - entries

  • 10.37.18.139 is the VCS Virtual IP (IP for the L2 Fabric).
  • osversion - NOS version on the L2 Fabric.
  • nretries - number of netconf to the switch will be retried in case of failure
  • ndelay - time delay in seconds between successive netconf commands in case of failure
    [topology] - entries
  • Here physical connectivity between NIC, PhysNet (Host side) and Switch Interfaces are provided

Openstack Compute Configurations (L2 Non AMPP Setup)

Following configuration lines needs to be available in one of the configuration files used by openvswitch agent.
e.g /etc/neutron/plugins/openvswitch/ovs_neutron_plugin.ini

[ovs]
bridge_mappings = physnet1:br1
network_vlan_ranges = 2:500
tenant_network_type = vlan

Here,

  • ‘br1’ is the openvswith bridge.
  • ‘2:500’ is the vlan range used

Openstack CLI Comands

Create Networks

Create a GREEN Network (10.0.0.0/24) using neutron CLI’s. Note down the id of the network created which will be used during subsequent nova boot commands.

user@controller:~$ neutron net-create GREEN_NETWORK
user@controller:~$ neutron subnet-create GREEN_NETWORK 10.0.0.0/24 --name GREEN_SUBNET --gateway=10.0.0.1
user@controller:~$ neutron net-show GREEN_NETWORK
+---------------------------+--------------------------------------+
| admin_state_up            | True                                 |
| availability_zone_hints   |                                      |
| availability_zones        | nova                                 |
| created_at                | 2016-04-12T09:38:45                  |
| description               |                                      |
| id                        | d5c94db7-9040-481c-b33c-252618fb71f8 |
| ipv4_address_scope        |                                      |
| ipv6_address_scope        |                                      |
| mtu                       | 1500                                 |
| name                      | GREEN_NETWORK                        |
| port_security_enabled     | True                                 |
| provider:network_type     | vlan                                 |
| provider:physical_network | physnet1                             |
| provider:segmentation_id  | 12                                   |
| router:external           | False                                |
| shared                    | False                                |
| status                    | ACTIVE                               |
| subnets                   | 1217d77d-2638-4c5c-9777-f5cd4f4e5045 |
| tags                      |                                      |
| tenant_id                 | ed2196b380214e6ebcecc7d70e01eba4     |
| updated_at                | 2016-04-12T09:38:45                  |
+---------------------------+--------------------------------------+

Check the availability Zones, We will launch one VM each on one of the servers.

user@controller:~$ nova availability-zone-list
+-----------------------+----------------------------------------+
| Name                  | Status                                 |
+-----------------------+----------------------------------------+
| internal              | available                              |
| |- controller         |                                        |
| | |- nova-conductor   | enabled :-) 2016-04-11T05:10:06.000000 |
| | |- nova-scheduler   | enabled :-) 2016-04-11T05:10:07.000000 |
| | |- nova-consoleauth | enabled :-) 2016-04-11T05:10:07.000000 |
| nova                  | available                              |
| |- compute            |                                        |
| | |- nova-compute     | enabled :-) 2016-04-11T05:10:10.000000 |
| |- controller         |                                        |
| | |- nova-compute     | enabled :-) 2016-04-11T05:10:05.000000 |
+-----------------------+----------------------------------------+

Launching Virtual Machines

Boot VM1 on Server by the name “controller”

user@controller:~$nova boot --nic net-id=$(neutron net-list | awk '/GREEN_NETWORK/ {print $2}') 
 --image cirros-0.3.4-x86_64-uec --flavor m1.tiny --availability-zone nova:controller VM1

Boot VM2 on Server by the name “compute”

user@controller:~$nova boot --nic net-id=$(neutron net-list | awk '/GREEN_NETWORK/ {print $2}')
 --image cirros-0.3.4-x86_64-uec --flavor m1.tiny --availability-zone nova:compute VM2

VDX

Following L2 Networking entries would be created on VDX Switches.

sw0# show running-config interface TenGigabitEthernet 135/0/10
interface TenGigabitEthernet 135/0/10
 switchport
 switchport mode trunk
 switchport trunk allowed vlan add 12
 switchport trunk tag native-vlan
 spanning-tree shutdown
 fabric isl enable
 fabric trunk enable
 no shutdown
!
sw0# show running-config interface TenGigabitEthernet 136/0/10
interface TenGigabitEthernet 136/0/10
 switchport
 switchport mode trunk
 switchport trunk allowed vlan add 12
 switchport trunk tag native-vlan
 spanning-tree shutdown
 fabric isl enable
 fabric trunk enable
 no shutdown
!

Ping between Virtual Machines across Hosts

We should now be able to ping between Virtual Machines on the two host servers.

SVI/L3 Networking Brocade VDX Plugin


Brocade Openstack VDX Plugin SVI(L3) Networking

This describes the setup of Openstack Plugins for Brocade VDX devices for L3/SVI networking
https://github.com/openstack/networking-brocade/tree/master/networking_brocade/vdx
Setup of Openstack Plugin

Fig 1. Setup of VDX Fabric with Compute Nodes
The figure(fig 1) shows a typical Physical deployment of Servers(Compute Nodes) connected to VDX L2 Fabric.
  • eth1 on the controller Node is connected to VDX interface (e.g Te 135/0/10)
  • eth1 on the compute Node is connected to VDX interface (e.g Te 136/0/10)
  • NIC (eth1) on the servers (controller,compute ) are part of OVS bridge br1.
Note: To create bridge br1 on compute Nodes and add port eth1 to it.
sudo ovs-vsctl add-br br1
sudo ovs-vsctl add-port br1 eth1
There are two networks , GREEN(10.0.0.0/24) and RED(9.0.0.0/24).
Virtual Machines are created on both of these networks on each of the hosts. In this setup, we would try to establish routing across the two networks using Brocade L3/SVI Plugin.

Setup of Openstack Plugin

L3/SVI Networking can be setup on top of either L2(with AMPP Support) or L2(without AMPP support).
Please refer to the L2 Networking setup guides

Openstack Configurations (L3/SVI Setup)

Add the following line in ‘/etc/neutron/neutron.conf’ to enable Brocade SVI Plugin
service_plugins = networking_brocade.vdx.non_ampp.ml2driver.l3_router_plugin.BrocadeSVIPlugin
Following additional configuration lines needs to be added to either ‘/etc/neutron/plugins/ml2/ml2_conf_brocade.ini’ or ‘/etc/neutron/plugins/ml2/ml2_conf.ini’.
If added to ‘/etc/neutron/plugins/ml2/ml2_conf_brocade.ini’ then this file should be given as config parameter during neutron-server startup.
[svi]
#List of rbridges on which 
rbridge_ids=135,136
is_vrf_required = True
#enable L3 redundancy if needed by default redundancy is disabled
redundancy=enabled
vrrp_version = 2
vrrp_group_id = 100
vrrp_advertisement_interval = 5
Here [svi]
  • rbridge_ids - list of rbridges on which Virtual Routing instances would be created.
  • redundancy - Is to be set to enabled if Virtual Routing instances have to be created on multiple rbridges.
Note : [ml2_brocade] configuration lines needs to be added as per the L2 Setup (AMPP or Non AMPP)

Openstack CLI Comands

Create Networks

Create a GREEN Network (10.0.0.0/24) using neutron CLI’s. Note down the id of the network created which will be used during subsequent nova boot commands.
user@controller:~$ neutron net-create GREEN_NETWORK
user@controller:~$ neutron subnet-create GREEN_NETWORK 10.0.0.0/24 --name GREEN_SUBNET --gateway=10.0.0.1
user@controller:~$ neutron net-show GREEN_NETWORK
+---------------------------+--------------------------------------+
| admin_state_up            | True                                 |
| availability_zone_hints   |                                      |
| availability_zones        | nova                                 |
| created_at                | 2016-04-12T09:38:45                  |
| description               |                                      |
| id                        | d5c94db7-9040-481c-b33c-252618fb71f8 |
| ipv4_address_scope        |                                      |
| ipv6_address_scope        |                                      |
| mtu                       | 1500                                 |
| name                      | GREEN_NETWORK                        |
| port_security_enabled     | True                                 |
| provider:network_type     | vlan                                 |
| provider:physical_network | physnet1                             |
| provider:segmentation_id  | 12                                   |
| router:external           | False                                |
| shared                    | False                                |
| status                    | ACTIVE                               |
| subnets                   | 1217d77d-2638-4c5c-9777-f5cd4f4e5045 |
| tags                      |                                      |
| tenant_id                 | ed2196b380214e6ebcecc7d70e01eba4     |
| updated_at                | 2016-04-12T09:38:45                  |
+---------------------------+--------------------------------------+
Create a RED Network (9.0.0.0/24) using neutron CLI’s. Note down the id of the network created
which will be used during subsequent nova boot commands.
user@controller:~$ neutron net-create RED_NETWORK
user@controller:~$ neutron subnet-create RED_NETWORK 9.0.0.0/24 --name RED_SUBNET --gateway=9.0.0.1
user@controller:~$ neutron net-show RED_NETWORK
+---------------------------+--------------------------------------+
| admin_state_up            | True                                 |
| availability_zone_hints   |                                      |
| availability_zones        | nova                                 |
| created_at                | 2016-04-12T09:39:53                  |
| description               |                                      |
| id                        | c994f6a1-5629-4617-b2af-64be34a744ec |
| ipv4_address_scope        |                                      |
| ipv6_address_scope        |                                      |
| mtu                       | 1500                                 |
| name                      | RED_NETWORK                          |
| port_security_enabled     | True                                 |
| provider:network_type     | vlan                                 |
| provider:physical_network | physnet1                             |
| provider:segmentation_id  | 33                                   |
| router:external           | False                                |
| shared                    | False                                |
| status                    | ACTIVE                               |
| subnets                   | 392fd70e-0c04-44db-8e4f-d5d6f4e1c09b |
| tags                      |                                      |
| tenant_id                 | ed2196b380214e6ebcecc7d70e01eba4     |
| updated_at                | 2016-04-12T09:39:53                  |
+---------------------------+--------------------------------------+
Check the availability Zones, We will launch one VM each on one of the servers.
user@controller:~$ nova availability-zone-list
+-----------------------+----------------------------------------+
| Name                  | Status                                 |
+-----------------------+----------------------------------------+
| internal              | available                              |
| |- controller         |                                        |
| | |- nova-conductor   | enabled :-) 2016-04-11T05:10:06.000000 |
| | |- nova-scheduler   | enabled :-) 2016-04-11T05:10:07.000000 |
| | |- nova-consoleauth | enabled :-) 2016-04-11T05:10:07.000000 |
| nova                  | available                              |
| |- compute            |                                        |
| | |- nova-compute     | enabled :-) 2016-04-11T05:10:10.000000 |
| |- controller         |                                        |
| | |- nova-compute     | enabled :-) 2016-04-11T05:10:05.000000 |
+-----------------------+----------------------------------------+

Launching Virtual Machines

Boot VM1 on Server by the name “controller”
user@controller:~$nova boot --nic net-id=$(neutron net-list | awk '/GREEN_NETWORK/ {print $2}') 
 --image cirros-0.3.4-x86_64-uec --flavor m1.tiny --availability-zone nova:controller VM1
Boot VM2 on Server by the name “compute”
user@controller:~$nova boot --nic net-id=$(neutron net-list | awk '/GREEN_NETWORK/ {print $2}')
 --image cirros-0.3.4-x86_64-uec --flavor m1.tiny --availability-zone nova:compute VM2
Boot VM3 on Server by the name “controller”
user@controller:~$nova boot --nic net-id=$(neutron net-list | awk '/RED_NETWORK/ {print $2}') 
 --image cirros-0.3.4-x86_64-uec --flavor m1.tiny --availability-zone nova:controller VM3
Boot VM4 on Server by the name “compute”
user@controller:~$nova boot --nic net-id=$(neutron net-list | awk '/RED_NETWORK/ {print $2}') 
 --image cirros-0.3.4-x86_64-uec --flavor m1.tiny --availability-zone nova:compute VM4

Create a Router

Create a Router instance having both the networks (GREEN_NETWORK and RED_NETWORK)
neutron router-create demo-router
neutron router-interface-add demo-router GREEN_SUBNET
neutron router-interface-add demo-router RED_SUBNET

VDX

Following Routing instances would have created on VDX
sw0# show running-config rbridge-id 135 vrf
rbridge-id 135
 vrf openstack-vrf-b076cce6-299d-4499
  rd 0766:0766
  address-family ipv4 unicast
  !
 !
 vrf test
  rd 10:10
 !
!

sw0# show running-config rbridge-id 135 interface ve
rbridge-id 135
 interface Ve 12
  vrf forwarding openstack-vrf-b076cce6-299d-4499
  ip proxy-arp
  ip address 10.0.0.5/24
  vrrp-group 100 version 2
   virtual-ip 10.0.0.1
   advertisement-interval 5
   enable
   preempt-mode
   priority 1
  !
  no shutdown
 !
 interface Ve 33
  vrf forwarding openstack-vrf-b076cce6-299d-4499
  ip proxy-arp
  ip address 9.0.0.6/24
  vrrp-group 100 version 2
   virtual-ip 9.0.0.1
   advertisement-interval 5
   enable
   preempt-mode
   priority 1
  !
  no shutdown
 !
!

Ping between Virtual Machines across Networks

We should now be able to ping between Virtual Machines across Networks (GREEN_Network and RED_NETWORK)

Sunday, 10 April 2016

Brocade Openstack VDX Plugin AMPP

Brocade Openstack VDX Plugin (AMPP)

This describes the setup of Openstack Plugins for Brocade VDX devices.


Fig 1. Setup of VDX Fabric with Compute Nodes
The figure(fig 1) shows a typical Physical deployment of Servers(Compute Nodes) connected to VDX L2 Fabric. 

eth1 on the compute Node is connected to VDX interface (e.g Te 135/0/10) and eth1 is part of an OVS bridge br1.

Note: To create bridge br1 on compute Nodes and add port eth1 to it.

sudo ovs-vsctl add-br br1
sudo ovs-vsctl add-port br1 eth1