Brocade Openstack VDX Plugin (AMPP)
This describes the setup of Openstack Plugins for Brocade VDX devices for L2 Networking with AMPP
https://github.com/openstack/networking-brocade/tree/master/networking_brocade/vdx
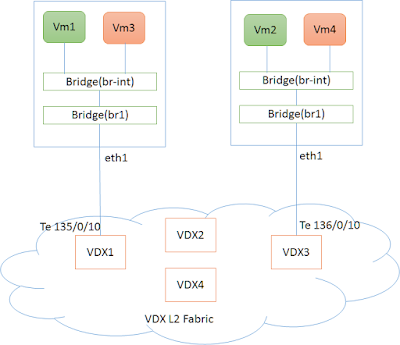
Fig 1. Setup of VDX Fabric with Compute Nodes
The figure(fig 1) shows a typical Physical deployment of Servers(Compute Nodes) connected to VDX L2 Fabric.
- eth1 on the controller Node is connected to VDX interface (e.g Te 135/0/10)
- eth1 on the compute Node is connected to VDX interface (e.g Te 136/0/10)
- NIC (eth1) on the servers (controller,compute ) are part of OVS bridge br1.
Note: To create bridge br1 on compute Nodes and add port eth1 to it.
sudo ovs-vsctl add-br br1
sudo ovs-vsctl add-port br1 eth1
In this setup, Virtual Machines would be created on each of the host servers(controller,compute) on a network by the name Green (10.0.0.0/24)
Setup of Openstack Plugin
Pre-requisites
Brocade Plugins require a specific version of ncclient (Net conf library). It can be obtained from the following github location.
git clone https://github.com/brocade/ncclient
cd ncclient
sudo python setup.py install
Install Plugin
git clone https://github.com/openstack/networking-brocade.git --branch=<stable/branch_name>
cd networking-brocade
sudo python setup.py install
Note: branch is an optional if the latest files(master branch) from the repository is required.
Upgrade the Database
Upgrade the database so that Brocade specific table entries are created in neutron database
 neutron-db-manage  --config-file /etc/neutron/neutron.conf
  --config-file /etc/neutron/plugins/ml2/ml2_conf.ini upgrade head
Openstack Controller Configurations (L2 Non AMPP Setup)
Following configuration lines needs to be available in ‘/etc/neutron/plugins/ml2/ml2_conf.ini’ to start Brocade VDX Mechanism driver (brocade_vdx_vlan).
[ml2]
tenant_network_types = vlan
type_drivers = vlan
mechanism_drivers = openvswitch,brocade_vdx_ampp
[ml2_type_vlan]
network_vlan_ranges = physnet1:2:500
[ovs]
bridge_mappings = physnet1:br1
Here,
- mechanism driver needs to be set to ‘brocade_vdx_ampp’ along with openvswitch.
- ‘br1’ is the openvswith bridge.
- ‘2:500’ is the vlan range used
Following configuration lines for the VDX Fabric needs to be added to either ‘/etc/neutron/plugins/ml2/ml2_conf_brocade.ini’ or ‘/etc/neutron/plugins/ml2/ml2_conf.ini’.
If added to ‘/etc/neutron/plugins/ml2/ml2_conf_brocade.ini’ then this file should be given as config parameter during neutron-server startup.
[ml2_brocade]
username = admin
password = password
address  = 10.37.18.139
ostype   = NOS
physical_networks = physnet1
osversion=5.0.0
initialize_vcs = True
nretries = 5
ndelay = 10
nbackoff = 2
Here,
[ml2_brocade] - entries
- 10.37.18.139 is the VCS Virtual IP (IP for the L2 Fabric).
- osversion - NOS version on the L2 Fabric.
- nretries - number of netconf to the switch will be retried in case of failure
- ndelay - time delay in seconds between successive netconf commands in case of failure
Openstack Compute Configurations (L2 AMPP Setup)
Following configuration lines needs to be available in one of the configuration files used by openvswitch agent.
e.g /etc/neutron/plugins/openvswitch/ovs_neutron_plugin.ini
[ovs]
bridge_mappings = physnet1:br1
network_vlan_ranges = 2:500
tenant_network_type = vlan
Here,
- ‘br1’ is the openvswitch bridge.
- ‘2:500’ is the vlan range used
VDX Configurations
Put all the interfaces connected to compute node in port-profile mode. This is a one-time configuration. (Te 135/0/10 and Te 136/0/10 in the topology above).
sw0(config)#  interface TenGigabitEthernet 135/0/10
sw0(conf-if-te-135/0/10)# port-profile-port
sw0(config)#  interface TenGigabitEthernet 136/0/10
sw0(conf-if-te-136/0/10)# port-profile-port
Openstack CLI Comands
Create Networks
Create a GREEN Network (10.0.0.0/24) using neutron CLI’s. Note down the id of the network created which will be used during subsequent nova boot commands.
user@controller:~$ neutron net-create GREEN_NETWORK
user@controller:~$ neutron subnet-create GREEN_NETWORK 10.0.0.0/24 --name GREEN_SUBNET --gateway=10.0.0.1
user@controller:~$ neutron net-show GREEN_NETWORK
+---------------------------+--------------------------------------+
| admin_state_up            | True                                 |
| availability_zone_hints   |                                      |
| availability_zones        | nova                                 |
| created_at                | 2016-04-12T09:38:45                  |
| description               |                                      |
| id                        | d5c94db7-9040-481c-b33c-252618fb71f8 |
| ipv4_address_scope        |                                      |
| ipv6_address_scope        |                                      |
| mtu                       | 1500                                 |
| name                      | GREEN_NETWORK                        |
| port_security_enabled     | True                                 |
| provider:network_type     | vlan                                 |
| provider:physical_network | physnet1                             |
| provider:segmentation_id  | 12                                   |
| router:external           | False                                |
| shared                    | False                                |
| status                    | ACTIVE                               |
| subnets                   | 1217d77d-2638-4c5c-9777-f5cd4f4e5045 |
| tags                      |                                      |
| tenant_id                 | ed2196b380214e6ebcecc7d70e01eba4     |
| updated_at                | 2016-04-12T09:38:45                  |
+---------------------------+--------------------------------------+
Check the availability Zones, We will launch one VM each on one of the servers.
user@controller:~$ nova availability-zone-list
+-----------------------+----------------------------------------+
| Name                  | Status                                 |
+-----------------------+----------------------------------------+
| internal              | available                              |
| |- controller         |                                        |
| | |- nova-conductor   | enabled :-) 2016-04-11T05:10:06.000000 |
| | |- nova-scheduler   | enabled :-) 2016-04-11T05:10:07.000000 |
| | |- nova-consoleauth | enabled :-) 2016-04-11T05:10:07.000000 |
| nova                  | available                              |
| |- compute            |                                        |
| | |- nova-compute     | enabled :-) 2016-04-11T05:10:10.000000 |
| |- controller         |                                        |
| | |- nova-compute     | enabled :-) 2016-04-11T05:10:05.000000 |
+-----------------------+----------------------------------------+
Launching Virtual Machines
Boot VM1 on Server by the name “controller”
user@controller:~$nova boot --nic net-id=$(neutron net-list | awk '/GREEN_NETWORK/ {print $2}')
 --image cirros-0.3.4-x86_64-uec --flavor m1.tiny --availability-zone nova:controller VM1
Boot VM2 on Server by the name “compute”
user@controller:~$nova boot --nic net-id=$(neutron net-list | awk '/GREEN_NETWORK/ {print $2}')
 --image cirros-0.3.4-x86_64-uec --flavor m1.tiny --availability-zone nova:compute VM2
VDX
Following L2 Networking entries would be created on VDX Switches.
sw0(conf-if-te-136/0/10)# do show port-profile status
Port-Profile              PPID   Activated        Associated MAC  Interface
UpgradedVlanProfile       1      No               None            None
openstack-profile-12      2      Yes              fa16.3ecb.2fab   Te 135/0/10
                                                  fa16.3ee4.b736   Te 136/0/10
Ping between Virtual Machines across Hosts
We should now be able to ping between Virtual Machines on the two host servers.
No comments:
Post a Comment